Follow the
step to configure oracle data source in WebSphere Application Server v 8.5 on windows:
If u want to watch installation process click on
below link
Note:
I installed oracle 10g Express edition. U can download it. Also download
"ojdbc6.jar" from internet.
Check below links to get installation process of oracle 10g Express edition and creating new user in oracle 10g express.
1.First create one deployment profile
(dmgr), one Custom profile (node).
2.Federate node to dmgr.
3.Open Admin Console in browser.
ex:
http://:/ibm/console
4.I divided this task into 3 parts (Generally
to configure data source we will follow like this only).
1)Creating
an authentication alias.
2)Creating
the JDBC provider.
3)Creating
data source.
5)Let us do it now..........
Task 1) Creating an authentication alias:
Normally an authentication alias
is required to access database. An authentication alias contains user ID and
Password.
Now follow the step to
complete this step.
1)Login to admin console, Expand
Security------->Click on "Global Security"
2)In authentication page, Expand
"Java Authentication and Authorization Service"-------->Click on
"J2C authentication data".

3)Click on "New".

4)Provide the values for Alias, User ID
and Password. Here User Id and Password must have to access the database.
ex:
Alias ----------- Sample_login
User
ID ----------- sample (It is my database User ID)
Password ----------- xxxxxxxx(It
is my database password)

Note: Here User ID and Password change
according to your database.
5)Click on "Apply". Then Click
on "review" and select the check box "Synchronize changes with
Nodes" and click on "Save". Click on "Ok".
6)Now
u can check an authentication alias is created. It is like below image.

7)We completed first task......Now we will
move to next task.....
Task 2)Creating the JDBC provider:
Follow the steps to
complete this task.......
1)Expand "Resources" in the
admin console.
2)Expand "JDBC". Click on "JDBC
Provides". Then

3)Click on "New".

4)Provide the Database type, Provider
Type, Implementation type and Name. Then click on "Next"
Ex:
Database
type -------- oracle
Provider
type -------- oracle JDBC Driver
Implementation
type -------- Connection pool data source
Name -------- oracle JDBC Driver (It is
default name. If u want to change u will modify it)

5)Provide the path for jar files.(Where it
is saved in your box).Then click on "Next".

6)Verify summary. Click on
"Finish". Then Click on "review" and select the check box
"Synchronize changes with Nodes" and click on "Save". Click
on "Ok".

7)Now u can check JDBC driver is created.

8) We completed Second task......Now we
will move to last task.....
Task 3)Creating data source:
Follow the steps to
complete this task......
1)Expand "Resources" in the
admin console.
2)Expand "JDBC". Click on
"Data sources". Then Select the Scope( I selected node scope).

3)Click on "New".

4)Provide Data source name and JNDI name.
Then click on "Next".
ex:
Data
source name -------- sample
JNDI
name -------- jndi/sample

5)Select "select an existing JDBC
provide" radio button. Then select "oracle JDBC driver" in drop
down list. Then click on "Next".

6)Specify the URL.
ex:
jdbc:oracle:thin:@localhost:1521:XE

7)Select "Component-managed
authentication alias", "Mapping-configuration alias " and
"Container-managed authentication alias" from drop down list. Then
click on "Next".
ex:
Component-managed
authentication alias ---- Sample_login
Container-managed
authentication alias ---- Sample_login

Here Sample_login is name of an
authentication alias.
8)Verify summary. Click on
"Finish". Then Click on "review" and select the check box
"Synchronize changes with Nodes" and click on "Save". Click
on "Ok".

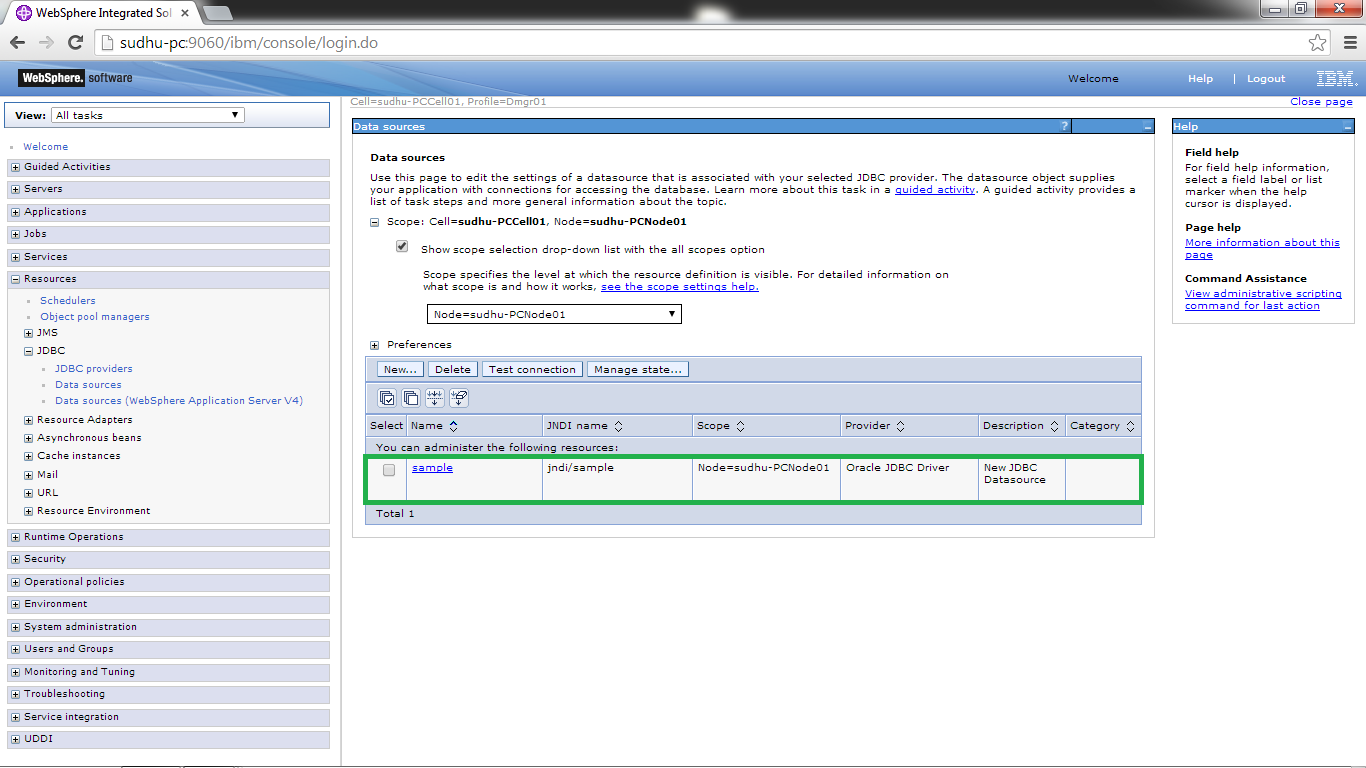
9)Now u can check Data source is created.
8) We completed all tasks......Now we will
check test connection.....
9)Select "sample"(My data source
name) and click on "Test
connection".

10)Verify test connection is successful or
not. If it is successful u will get message like below image.

Subscribe My blog and send e-mail id for getting my articles in PDFs.....
Subscribe My You Tube channel to get alerts to your email....
Thanks. Comments & feedback r most welcome.
No comments:
Post a Comment